ESP32 Temperature and Moisture Monitoring with MQTT
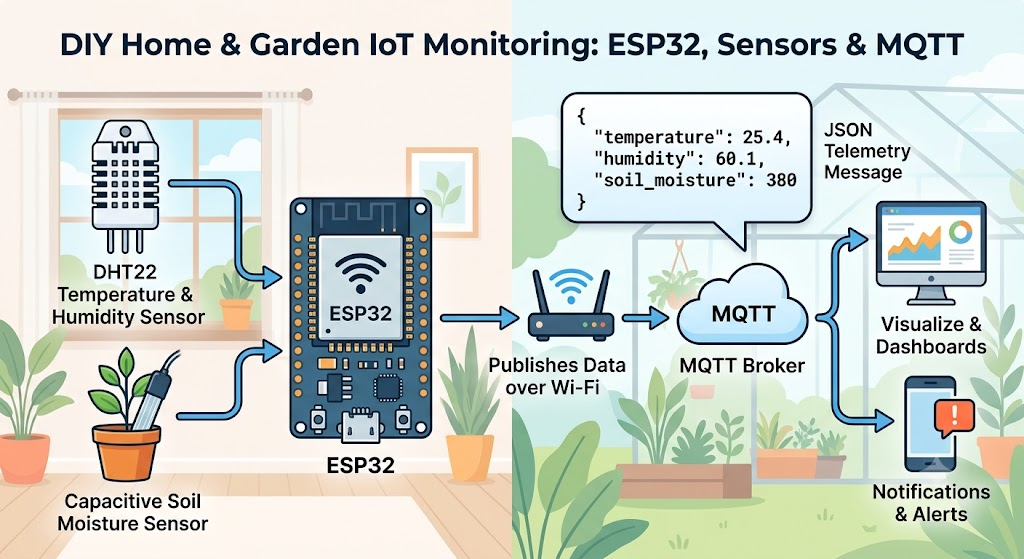
An ESP32, a few sensors, and MQTT are enough to build a useful monitoring device for a home, greenhouse, or small IoT system. In this project, the ESP32 reads temperature, air humidity, and soil moisture, then publishes the measurements to an MQTT broker over Wi-Fi.
The same architecture can later be extended with dashboards, alerts, data storage, or automatic irrigation.
What we will build
The device will:
- Connect to a Wi-Fi network
- Read temperature and air humidity from a DHT22 sensor
- Read soil moisture from an analog capacitive sensor
- Publish measurements as a JSON message over MQTT
- Reconnect automatically when Wi-Fi or MQTT is temporarily unavailable
The data will be published to:
1home/garden/esp32-01/telemetry
An example payload is:
1{
2  "temperature": 27.4,
3  "humidity": 68.2,
4  "soil_moisture": 54
5}
Hardware
You need:
- ESP32 development board
- DHT22 or AM2302 temperature and humidity sensor
- Capacitive soil moisture sensor with an analog output
- 10 kOhm resistor if your DHT22 module does not include a pull-up resistor
- Jumper wires and a breadboard
Example connections
| Component | ESP32 |
|---|---|
| DHT22 VCC | 3.3V |
| DHT22 GND | GND |
| DHT22 DATA | GPIO 4 |
| Soil sensor VCC | 3.3V |
| Soil sensor GND | GND |
| Soil sensor AO | GPIO 34 |
GPIO 34 is input-only, which makes it a suitable pin for an analog sensor on many ESP32 boards. Check the pinout of your specific board before wiring it.
MQTT architecture
MQTT uses a publish/subscribe model:
- The ESP32 acts as an MQTT publisher.
- The broker receives the telemetry.
- A dashboard, automation service, or another device subscribes to the topic.
This keeps the sensor firmware independent from the application consuming the data. The ESP32 does not need to know whether the data is displayed in Node-RED, Home Assistant, or a custom backend.
For local development, you can use Mosquitto as the broker:
1mosquitto_sub -h localhost -t 'home/garden/esp32-01/telemetry' -v
Arduino libraries
Install these libraries from the Arduino IDE Library Manager:
- DHT sensor library
- Adafruit Unified Sensor
- PubSubClient
The ESP32 Wi-Fi library is included with the ESP32 Arduino core.
ESP32 example code
The following sketch reads the sensors every 30 seconds and publishes a JSON payload:
 1#include <ArduinoJson.h>
 2#include <DHT.h>
 3#include <PubSubClient.h>
 4#include <WiFi.h>
 5
 6const char *WIFI_SSID = "your-wifi-ssid";
 7const char *WIFI_PASSWORD = "your-wifi-password";
 8const char *MQTT_HOST = "192.168.1.100";
 9const int MQTT_PORT = 1883;
10const char *MQTT_TOPIC = "home/garden/esp32-01/telemetry";
11
12constexpr uint8_t DHT_PIN = 4;
13constexpr uint8_t DHT_TYPE = DHT22;
14constexpr uint8_t SOIL_MOISTURE_PIN = 34;
15constexpr unsigned long PUBLISH_INTERVAL_MS = 30000;
16
17DHT dht(DHT_PIN, DHT_TYPE);
18WiFiClient wifiClient;
19PubSubClient mqttClient(wifiClient);
20unsigned long lastPublish = 0;
21
22void connectWiFi() {
23  WiFi.begin(WIFI_SSID, WIFI_PASSWORD);
24  while (WiFi.status() != WL_CONNECTED) {
25    delay(500);
26  }
27}
28
29void connectMQTT() {
30  while (!mqttClient.connected()) {
31    String clientId = "esp32-" + String((uint32_t)ESP.getEfuseMac(), HEX);
32    if (!mqttClient.connect(clientId.c_str())) {
33      delay(2000);
34    }
35  }
36}
37
38void publishTelemetry() {
39  const float temperature = dht.readTemperature();
40  const float humidity = dht.readHumidity();
41  const int soilRaw = analogRead(SOIL_MOISTURE_PIN);
42
43  if (isnan(temperature) || isnan(humidity)) {
44    return;
45  }
46
47  // Calibrate these limits for the specific soil sensor and application.
48  const int soilMoisture = constrain(map(soilRaw, 3000, 1200, 0, 100), 0, 100);
49
50  StaticJsonDocument<192> document;
51  document["temperature"] = round(temperature * 10) / 10.0;
52  document["humidity"] = round(humidity * 10) / 10.0;
53  document["soil_moisture"] = soilMoisture;
54
55  char payload[192];
56  serializeJson(document, payload, sizeof(payload));
57  mqttClient.publish(MQTT_TOPIC, payload);
58}
59
60void setup() {
61  Serial.begin(115200);
62  dht.begin();
63  connectWiFi();
64  mqttClient.setServer(MQTT_HOST, MQTT_PORT);
65}
66
67void loop() {
68  if (WiFi.status() != WL_CONNECTED) {
69    connectWiFi();
70  }
71
72  if (!mqttClient.connected()) {
73    connectMQTT();
74  }
75  mqttClient.loop();
76
77  if (millis() - lastPublish >= PUBLISH_INTERVAL_MS) {
78    lastPublish = millis();
79    publishTelemetry();
80  }
81}
The example uses ArduinoJson, so install that library as well. Replace the Wi-Fi credentials and broker address before uploading the sketch.
Calibrating the soil moisture sensor
Analog soil sensors do not produce a universal percentage. The raw value depends on the sensor, soil type, supply voltage, and how deeply the probe is inserted.
Record two values:
- The reading with the sensor in dry soil.
- The reading with the sensor in wet soil.
Then replace 3000 and 1200 in the map() call with the values measured by your sensor. The constrain() call keeps the published percentage between 0 and 100.
Testing the data
Subscribe to the MQTT topic and watch the messages:
1mosquitto_sub -h 192.168.1.100 \
2  -t 'home/garden/esp32-01/telemetry' \
3  -v
You should receive a new JSON message every 30 seconds. If no message appears, check the ESP32 serial monitor, Wi-Fi address, broker address, and firewall rules.
Important reliability improvements
This example is intentionally small, but a production device should also consider:
- MQTT username and password
- TLS encryption when data crosses an untrusted network
- Last-will and retained messages
- Sensor read error reporting
- Non-blocking reconnect logic
- Deep sleep if the device is battery powered
- A unique MQTT client ID for every device
Do not expose an unauthenticated MQTT broker directly to the public internet.
Conclusion
This project demonstrates a useful IoT pattern: the ESP32 handles sensing, MQTT handles transport, and another service handles visualization or automation.
The design is simple enough for a first project but flexible enough to grow. You can add more sensors, publish separate topics, subscribe to control commands, or trigger an irrigation pump when soil moisture falls below a threshold.
The most important steps are to calibrate the sensor, handle reconnects, and secure the MQTT connection before deploying the device in a real environment.